The DX4WIN Data Updater (the "Updater Program") helps you update the DX4WIN data files. It is intended for users of DX4WIN 4.07 through 8.05 only. Users of DX4WIN 9.01 and later should use Help | Check for Updates from the DX4WIN main menu.
The Updater Program can update:
DX4WIN.AWD - award database
DX4WIN.CAL - DX calendar
DX4WIN.CTY - country file
(including ADIF.PMP)
DX4WIN.MAS1 (DX4WIN.MAS) - master callsigns
DX4WIN.MAS2 - eQSL/LoTW users list
DX4WIN.TCP - DX cluster node internet addresses
DX4WIN.WPX - CQ WPX Honor Roll Deleted Prefixes
fullllist.xml - IOTA
islands (island groups are part of the country file)
It does NOT update the DX4WIN program itself!
Version 9.6 of the DX4WIN Data Updater was released on 24 June 2022 (NOTE: the version number is unrelated to the DX4WIN version number). If you are a new user, go to the Version History to download the installation program.
You should choose the update options that correspond to the version of DX4WIN for which you are licensed. The program will usually determine this on its own.
The Updater Program should run on the following versions of Microsoft Windows:
- Windows 98 (*)
- Windows XP
- Windows Vista
- Windows 7
- Windows 8
- Windows 10
- Windows 11
(*) untested
NOTE: at least one DX4WIN user noticed that Avast Antivirus software interferes with both installing and updating the program. There are also reports that Norton Security will block the program. You may want to temporarily disable your anti-virus software before performing an installation or update.
If anyone knows how to "register" a known-good program with any of the anti-virus vendors, please contact the webmaster address at the bottom of this page.
Quick Start
- Download the latest version of the installation file from the Version History below.
- Run the installation program you just downloaded. You'll be prompted for the installation directory. Make sure to install the program in the same directory (folder) as your DX4WIN.EXE file (i.e. C:\DX4W805). If you install the Updater Program in the wrong place, it will report an error when you try to run it.
- Double-click on the newly-installed desktop icon to run it. There is a default configuration for first-time users.
IMPORTANT: If you try to start the program and see any error messages like these:
- The program can't start because MFC140.dll is missing from your computer.
- The program can't start because MSVCP140.dll is missing from your computer.
- The program can't start because VCRUNTIME140.dll is missing from your computer.
then you need to download and install the Microsoft Visual C++ Redistributable for Visual Studio 2015, 2017 and 2019.
NOTE: This Microsoft library is not included in the installation program in order that you install the most recent version available.
If you are Windows XP user, and the Updater program runs without reporting any of the above errors, check which version of the Redistributable library you have installed. Make sure it's Update 3 or later. There is a bug in earlier versions of the library that prevents the updater from getting the file information (date/time and size) for any file that is already on your computer. Thus, the Updater will try to update every file every time you run it!
Features
- Updates DX4WIN data files without user having to download, UNZIP or move data
- Saves previous file versions in a backup directory to preserve your old data
- Only downloads and updates files that have changed since the last update
- User can choose the set of files to update
- The Updater can run in non-graphical mode, for example with the Windows Task Scheduler
- Country and award databases are downloaded as ZIP files to minimize download time
- Checks that the Updater Program itself has been installed in the correct directory
- Prevents updating if DX4WIN is running
- Retains custom DX Cluster nodes and keeps your favorite nodes at the top of the "Select Internet address" list
- Notifies you if the DX4WIN Data Updater program has been updated
- Does not touch any DX4WIN log or configuration files
- Does not install any items into the Windows registry
Disclaimer
The DX4WIN Data Updater is supplied "AS IS" without any warranties. Support is through the DX4WIN Reflector.
The author assumes no responsibility or liability for the use of the software, conveys no license or title under any patent, copyright, or mask work right to the product.
The author reserves the right to make changes to the software without notification. The author also make no representation or warranty that such application will be suitable for the specified use without further testing or modification.
Installation
After downloading the installation file from the Version History link below, run it to begin the installation. You will be prompted where to install the program. You must install it into your DX4W### directory (folder). This is the same directory where DX4WIN.EXE can be found (when viewed in Windows, there will be a dx4win "Application" and a dx4win "Icon" in that folder). Do not install it in your SAVE directory or anywhere else. When the Updater Program runs, it will check to see if it is installed in the correct directory.
Important
- If you have multiple (different) versions of DX4WIN installed on your
computer, and you want to keep each of them up-to-date, you must install the
Updater Program into each DX4WIN directory that has a
DX4WIN.EXE file. For example, if you have versions 7.07, 8.01 and 8.05
installed, you will have to install the Updater Program into the dx4w705,
dx4801 and dx4w805 directories. To update a particular version of DX4WIN,
you must run the Updater Program that is installed in that version's
directory.
- Once installed, you can choose for the Updater Program to check when a
program update is available. You will not have to download and run the full
installation program again.
- The Updater Program needs access to the Internet in order to download the updates. If you have a software firewall or other Internet blocking software running on your computer, you should configure that software to allow DX4WUPD.EXE to access the Internet.
NOTE: Because the icon for the Updater Program is similar to the icon for DX4WIN itself (both yellow with red, except with the word Update near the bottom), there may be some confusion trying to tell the two icons apart on your desktop. The Updater Program will try to prevent you from updating any files while DX4WIN is running (see Running the Updater Program below). However, if you feel strongly about making the icons different, you can change the Updater Program desktop shortcut icon. Right-click on the shortcut icon and choose "Properties". When the Properties window comes up, click on the "Change Icon..." button near the bottom (see the Properties example below. If the window does not look like that, then you are probably trying to change the properties of the wrong icon.).
When the "Change Icon" window appears, copy the following file path and paste it into the field labeled, "Look for icons in this file:", just to the left of the "Browse..." button, then type <ENTER>:
%SystemRoot%\system32\SHELL32.dll
You'll get a display of the available Windows icons (note that the end part of "SHELL32.dll" is not visible because the line is too long to display in the input field):
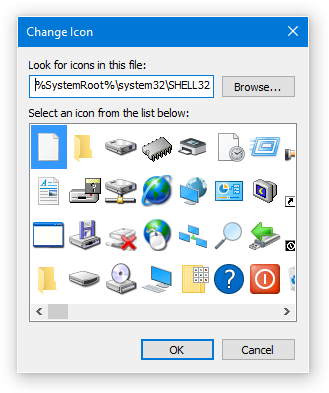
Choose whichever icon you like (note that there are more icons available than shown above, use the horizontal scroll bar to see the other choices).
Running the Updater Program
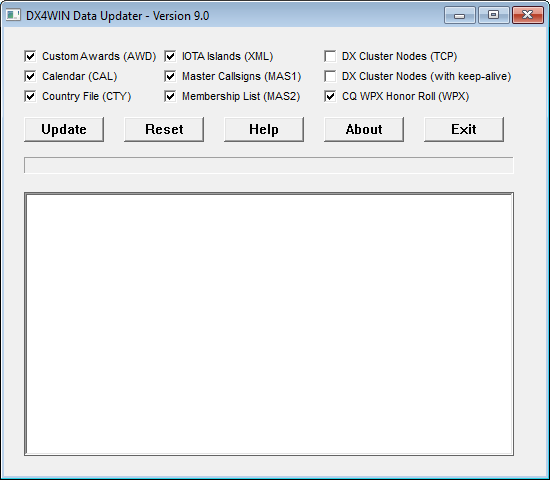
To run the DX4WIN Data Updater, simply double-click on the program icon that the installer added to your Windows desktop. You should see a window like the following:
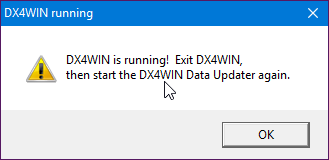
Before trying to update any files, the Updater Program will first check whether DX4WIN is running. DX4WIN should not be running while you are updating files! If it is, the Updater Program will let you know:
Windows 98 Notes
- The Updater Program is unable to determine whether DX4WIN is running on
Windows 98. Instead, you may see this:
If DX4WIN is not running, answer "Yes" to continue. If DX4WIN is running, you can exit (close) DX4WIN, then answer "Yes" to continue. If for some reason you do not want to exit (close) DX4WIN at this time, answer "No" and the Updater Program will exit. Updating the data files while DX4WIN is running will result in unpredictable behavior.Unable to determine whether DX4WIN is running. Are you sure you want to continue updating (y/n)?
Using the check boxes, select the data file(s) you would like to update (see Data File Selection below). Some data files are not available to older versions of DX4WIN, and that choice will be grayed out. When you are satisfied with your choices, click the Update button to perform the update. The other buttons perform the following actions:
- Reset
- Removes all the files from the UPDATE directory. This forces the Updater to perform a fresh update on all selected files.
- Help
- Brings up this web page in your default web browser.
- About
- Brings up small window showing the program version, author and revision date.
- Exit
- Exits the program.
Exiting the DX4WIN Data Updater will save all of your selections in an initialization file which is stored in the same directory as the DX4WIN Data Updater itself. This initialization file is separate from your DX4WIN preferences, and therefore will not alter those preferences in any way. Your selections will be restored automatically the next time you run the Updater Program. Occasionally, the program author will make a change that is incompatible with the existing initialization file. In that case, the existing initialization file will be deleted and new default settings will be used. You can then make changes by hand to restore your previous settings. There is no way to export or import saved settings like the DX4WIN Preferences.
Data File Selection
Many of the data files, like Custom Awards or Country File, simply have one checkbox to enable or disable the update of that data file (see above). Some of the data file type selections bring up a secondary selection window. Each of these secondary selection windows has a common set of features:
- You may choose one, some, all or none of the selections.
- Selecting none will uncheck the corresponding box on the main Updater Program window.
- Clicking the Clear button will clear all of the selections
- Clicking the Cancel button will undo any changes you have made, even if you have used the Clear button
Here is some additional information on the secondary selection windows:
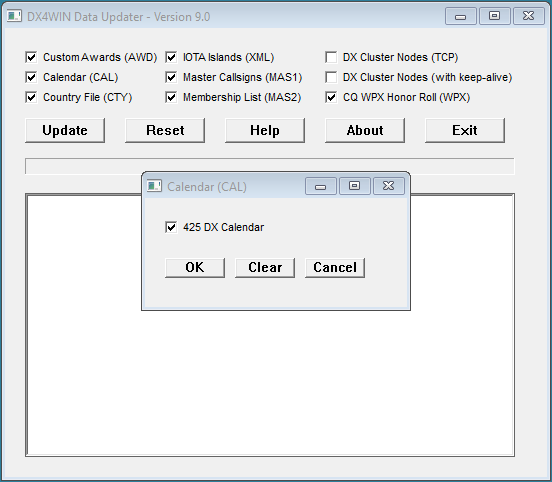
Calendar
Calendar events can be viewed when starting DX4WIN, or using the main menu selection File | Calendar. Clicking on the check box next to Calendar will bring up the Calendar selection sub-menu on top of the main window. The main window is disabled while the Calendar sub-menu is active.
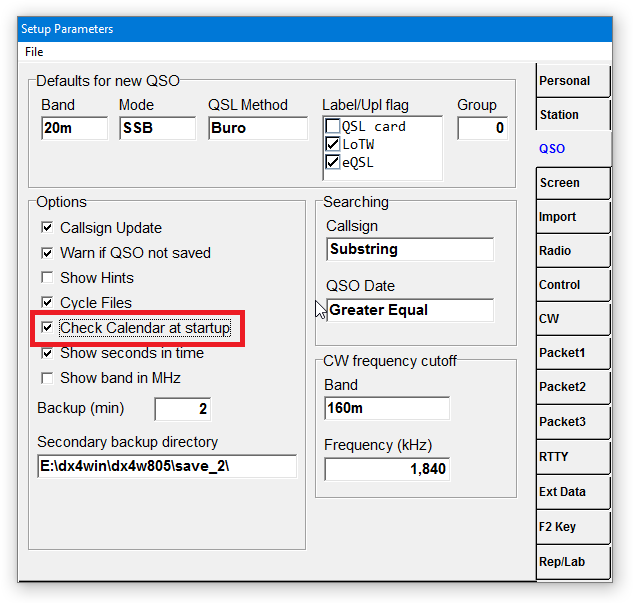
By default, the Calendar will be opened when DX4WIN starts, in order to show upcoming events. If you want to disable this feature, uncheck the box in your DX4WIN Preferences, on the QSO tab, as shown:
A future version of the Updater Program may provide the option of merging only new events into an existing calendar, as well as removing expired events. That functionality is not presently available.
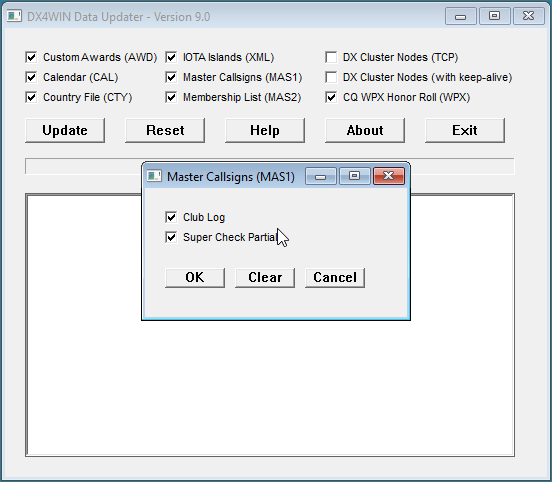
Master Callsigns
Master callsigns can be viewed by clicking on Windows | Master Calls in the QSO window. The MasterLookup window is updated as soon as you start typing a callsign into the QSO window. Clicking on the check box next to Master Callsigns will bring up the Master Callsign selection sub-menu on top of the main window. The main window is disabled while the Master Callsign sub-menu is active.
The user can select from two data sources:
- Club Log Super Check Partial Files (contains over 150K callsigns)
- Super Check Partial Database Files for Amateur Radio Contesting (contains over 45K callsigns)
Using both databases does not significantly increase the number of DX4WIN Master Callsigns, because most of the contesting callsigns are also in the Club Log database.
For users of DX4WIN 7.06 and later, the name of the master callsigns file is DX4WIN.MAS1. For users of DX4WIN 7.05 and earlier, the name of the master callsigns file is DX4WIN.MAS.The Updater program will automatically create the master callsign file with the correct name, based on the version of DX4WIN you are running.
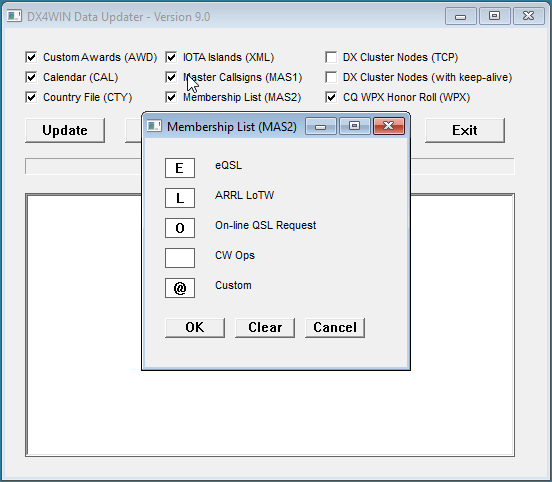
Membership List
DX spots of callsigns matching one or more membership lists are shown in the Memb column of the DX spots window, as shown below:
Clicking on the check box next to Membership List will bring up the Membership List selection sub-menu on top of the main window. The main window is disabled while the Membership List sub-menu is active.
This selection box is different from the others. Each selection is made by typing a single letter A-Z, the digits 0-9 or the special character '@' into the empty box next to the description. Lower case letters are automatically converted to UPPER case.
You can have up to four different membership IDs active at once. This is not the same as the number of membership lists, because multiple lists are allowed to share the same membership ID.
When the '@' character is used as a membership list ID, it will change the priority of DX spots of those members to the highest priority. Thus, those DX spots will appear as an all-time new one for DXCC, typically on a yellow background.
To clear a selection, you may use the Backspace key on your keyboard, or highlight the letter by double-clicking and typing either the Delete key or the space bar. All other keyboard characters other than those previously mentioned will be ignored.
The Custom selection is special. You may create a plain-text file called "member.txt" in the same directory as the DX4WIN Data Updater. This is the only file name and directory that is recognized the by the Updater Program. This plain-text file should be created using an editor such as Notepad or Write. Do not, for example, use Microsoft Word to create the file! The file contains a list of callsigns you would like in a custom membership list, with a single callsign per line. Here is an example of the one I am using:
            AD1C
            W1JR
            SV2ASP

            # 2016 All Bulgarian Saints

            LZ1012SGM
            LZ389SGB
            LZ300MSP
            LZ1700SIP
            LZ1867SEI
            LZ425STA
            LZ1886PGS
            LZ1043PMU
            LZ304MED
            LZ935MWC
            LZ960SPA
            LZ463PP
I want to treat these callsigns as highest-priority (all-time new ones) whenever they are spotted. For example, I like to know when/if I am spotted. The LZ calls listed above are all for the 2016 All Saints Diploma offered by the Bulgarian Club Blagovestnik.
Blank lines are ignored, as well as any lines not beginning with a letter or digit.
DX Cluster Nodes
There are two choices for updating the list of DX Cluster nodes: TCP and "keep-alive". The difference between the two options is that TCP downloads a DX Cluster node list that does not have keep-alive. Keep-alive is a feature whereby DX4WIN periodically sends a character to the remote cluster node, usually after some period of user inactivity, to signal that the remote node should "keep alive" its connection to DX4WIN. You can learn more about keep-alive by following this link.
These two options both update the same file (DX4WIN.TCP), so you should choose one or the other. In fact, the Updater will not allow you to select both!
Keep-alive does not always do as good a job as one might expect. The CC User DX Cluster Client Program does a much better job of maintaining a solid connection to a DX Cluster node, as well as downloading any missed DX spots. This program works with nodes running CC Cluster and DXSpider software. It does not work for nodes running AR-Cluster. For more information about using the VE7CC client with DX4WIN, follow this link.
Updating the DX Cluster nodes will maintain your "favorite" nodes at the top of the list. Furthermore, any custom nodes you may have added will be preserved.

What the Updater Does
Updated files are first downloaded to the DX4W###\UPDATE directory, before being automatically copied to the appropriate target directory. The Updater Program will only download a file if it is newer than the version already in the UPDATE directory, or if it doesn't already exist. The Updater Program will create the UPDATE directory if it does not already exist. If you want to force an update of all data files, click the Reset button before clicking the Update button.
Before updating each target file, the current file, if it exists, is moved to the DX4W###\BACKUP directory. The Updater Program will create the BACKUP directory if it does not already exist. There is no option to restore files from the BACKUP directory without manual intervention.
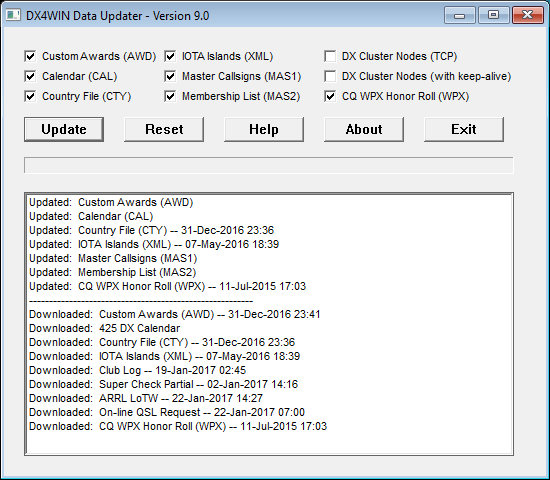
The Updater Program will show a colored progress bar for each download, as well as the status for each data file. When it has completed its work, the window will look similar to the following:
And you will get a pop-up window with the update status:
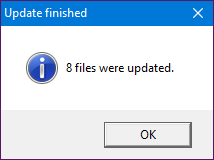
Click on OK to dismiss this window. If/when you are satisfied with the update, you may click the Exit button to close the program.
The window is divided into two sections. The section at the bottom shows the update status of each source file. This includes the files used to create the Calendar, Master Callsigns and Membership List. If the file is preceded by the word "Downloaded", then a new version of that file was downloaded. If it does not say Downloaded, the file you have is current. The file name will be preceded by the word "Downloading" while it is being downloaded. The section at the top shows each target file that was updated. If a target file was created from multiple sources, i.e. Calendar, Master Calls or Membership List, it is shown without a date.
When starting the DX4WIN Data Updater, it will automatically check if a newer version is available. This also helps the program detect whether a working Internet connection is available. If an update to the program is available, you will be prompted whether to download it.
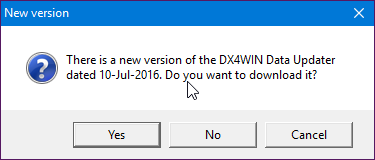
Click Yes to download the new version. After downloading, you will be asked if you want to use the new version, or continue using the current version. By clicking No at the above prompt, it will not download the new version, and you will be asked again the next time you run the Updater. Finally, if you click Cancel, the Updater program will "exit" without ever having actually started. It will not download the new version.
Before exiting, the Updater Program will check that the following required files are present.
- Custom Awards
- Country File
- DX Cluster nodes
- WPX Honor Roll prefixes
A warning box will pop-up if any of the files above are not found. DX4WIN will not run properly if these files are missing.
When the Updater Program runs, it creates a log file in the same directory as the program. This file "dx4wupd.log" contains some information about the update, as well as the version of the program and the DX4WIN version you are running.
Options
The following options control the Updater Program operation. These options are added onto the command line that starts the Updater Program. See the end of this section for details on how to set the options.
- –proxy : use a proxy address to get to the Internet.
This option allows you to specify the address of the proxy server you need to access the Internet. You must specify it exactly like this (don't include the <>):
-proxy <IP address>:<port>For example:
-proxy 163.44.119.72:8080- –quick : faster program exit
This option does two things:
- does not bring up the pop-window saying how many files were updated. The bold descriptions in the main window tell you what file(s) were updated.
- does not prompt, "Are you sure you want to exit?" when clicking on the Exit button
–auto : run Updater Program without graphical interface- This option is useful if you want to run the Updater Program as a scheduled Windows task. You can review the log file to see what has been updated.
–nocheck : don't check whether DX4WIN is running- This option is useful if you want to run the Updater Program as a scheduled Windows task, but don't want to have to exit DX4WIN first. Use with caution!
–debug :- This option writes additional debug information to the Updater Program log file. Only use this option if requested by the program author.
To add an option to the DX4WIN Data Updater, you must modify the properties of its desktop shortcut. Right-click on the DX4WIN Data Updater icon on your Windows desktop and choose Properties. Type the option, including the leading '–', at the end of the Target: field of the Properties window, as shown below. Make sure to include a blank space between the end of the line and between each option you add:
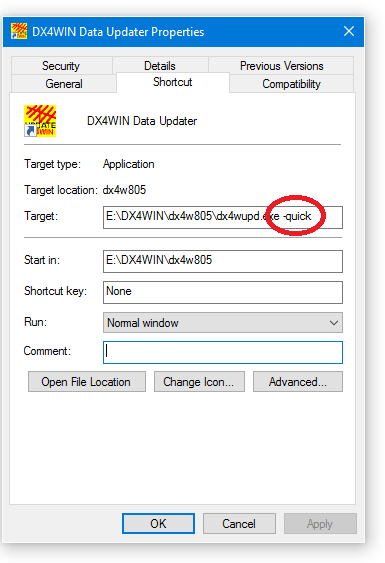
Then click on the OK button to save the changes.
Update Rules
These rules define how/when files are updated:
- DX4WIN.AWD - award database
- DX4WIN does not modify this file.
- It is downloaded when there is a new award database on this web site.
- It is downloaded as a ZIP file, then extracted from the ZIP file to the SAVE directory.
- DX4WIN.CAL - calendar
- DX4WIN does not modify this file.
- It is updated when at least one of the selected calendar sources changes.
- DX4WIN.CTY - country file
- DX4WIN re-writes this file every time you save your logbook or exit DX4WIN.
- It is downloaded when there is a new country file on this web site.
- It is downloaded as a ZIP file, then extracted from the ZIP file to the SAVE directory.
- DX4WIN.MAS1 (DX4WIN.MAS) - master callsigns
- DX4WIN does not modify this file.
- It is updated when at least one of the selected master callsign files changes.
- DX4WIN.MAS2 - eQSL/LoTW membership list
- DX4WIN does not modify this file.
- It is updated when at least one of the selected membership list files changes.
- DX4WIN.TCP - Internet addresses
- DX4WIN re-writes this file every time you connect to a different DX Cluster node.
- It is updated when there is a new DX4WIN.TCP file on this web site.
- DX4WIN.WPX - CQ WPX Honor Roll Deleted Prefixes
- DX4WIN does not modify this file.
- It is updated when there is a new file on this web site. The file is updated on an infrequent basis.
- ADIF.PMP - ADIF mapping file
- DX4WIN does not modify this file.
- It is always updated at the same time as DX4WIN.CTY (see above).
- fullllist.xml - IOTA islands
- DX4WIN does not modify this file.
- Since the old RSGB IOTA website was retired and replaced by the new Islands on the Air website, this file is no longer available. Recent versions of the DX4WIN Data Updater prevent you from updating this file.
Notes
- The update process does not do any merging (other than for DX Cluster
nodes). You still have the option of manually merging the new country file from
your old one, which was saved in the BACKUP directory.
- If you edited the awards database, you will have to copy those changes to the new file. You can find the previous database in the BACKUP directory.
To Do
- Tab to move between Membership List fields
- Bold/color in the status window
- Logbook backup (?)
- Calendar merge (?)
- More error checking (!)